How to Clip YouTube Videos?
Have you ever encountered an extremely remarkable scene in a YouTube video such that all you could think was, "I really wish I could save or share this particular moment"?YouTube's integrated clipping tool is here to meet your need. It offers a fast and straightforward method to create snippets from videos or live streams, enabling you to generate engaging, bite - sized highlights that are definitely worth sharing.However, if you're new to using this feature, initially understanding how to clip YouTube videos might seem a bit challenging.Here is a comprehensive, step - by - step guide to assist you in becoming proficient at clipping on YouTube.
- Author: Shine
- Update: Mar 17, 2025

What are YouTube clips?
YouTube clips are concise, share - worthy extracts derived from lengthier YouTube videos or live streams. Both content creators and viewers can utilize them to emphasize particular moments, be it a hilarious one - liner, a thought - provoking comment, or an astonishing action segment. Each clip has a duration ranging from 5 to 60 seconds and plays directly from the original video source. This ensures that the content creator continues to receive views and maintain audience engagement on their work.
In contrast to the processes of downloading and re - editing, YouTube clips leave the original video unaltered while presenting a convenient means to showcase its most appealing elements. They are ideal for sharing on social media platforms or with acquaintances, making it far simpler than before to promote excellent content!
Basics of How to Create Clips from YouTube Videos
Anyone can create clips of content on YouTube, as long as the original video creator has not turned off the clipping option. This functionality enables the sharing of important video moments while still taking into account the preferences of the content creators.
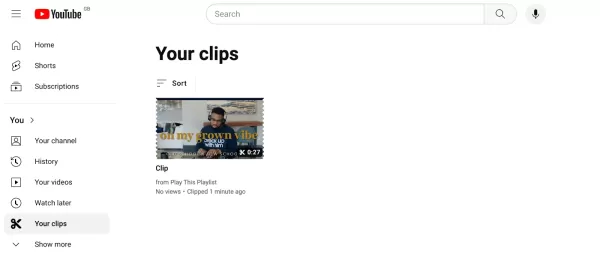
The clip - making feature on YouTube enables you to save a chosen part of a video, like a useful piece of advice or a comical scene. These clips must be between 5 and 60 seconds in length and are kept in the "Your Clips" area found in the sidebar of YouTube. Similar to YouTube Shorts, they play in a continuous loop and can be effortlessly shared through a generated shareable link.
How Can You Create Clips from YouTube Videos on a Desktop Computer?
Step 1: Locate the YouTube Video for Clipping
To begin with, log in to your YouTube account. Then, search for the video that you wish to create a clip from. You have the option to find it by looking through your own channel or by using the filtering options available in YouTube Studio to narrow down the videos.
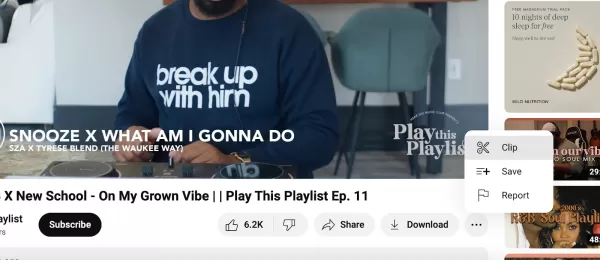
Step 2: Initiate the Creation of a New Clip
By default, the clipping feature on YouTube is activated for all channels, unless the content creator has specifically disabled it. Once you've identified the video you want to clip, click on the Menu icon (which consists of three vertical dots). From the dropdown menu, select the "Clip" option. When you do this, make sure to give your clip a name that is easy to remember and identify. This will make it simpler for you to access the clip later in your personal clip library.
Step 3: Set the Clip Duration by Dragging the Sliders
Manipulate the sliders to choose the specific part of the video you intend to clip. Remember that YouTube clips are required to have a minimum length of 5 seconds and a maximum length of 60 seconds. Thoroughly review the timestamps to guarantee that you don't inadvertently exclude crucial moments.
Step 4: Save Your YouTube Clip
After finalizing the timing, click on the "Share clip" button. There are multiple methods for sharing your clip:
Share the YouTube clip through email.
Obtain a shareable link that can be used to share the clip anywhere.
Embed the YouTube video clip on your website or blog.
Promote the YouTube clip on other social media platforms (be aware that this will not share the actual video but rather a link that directs users back to your YouTube channel).

Generate longer YouTube clips by means of Descript.
YouTube restricts the length of its clips to a range between 5 and 60 seconds. In cases where you require longer excerpts, for instance, highlights from a gaming session or more comprehensive tutorials, it would be advisable to utilize a professional video editing tool like Descript.
Moreover, Descript proves to be an excellent choice when you intend to share YouTube content snippets on platforms such as TikTok or Instagram Reels, instead of merely sharing a link to the YouTube video.
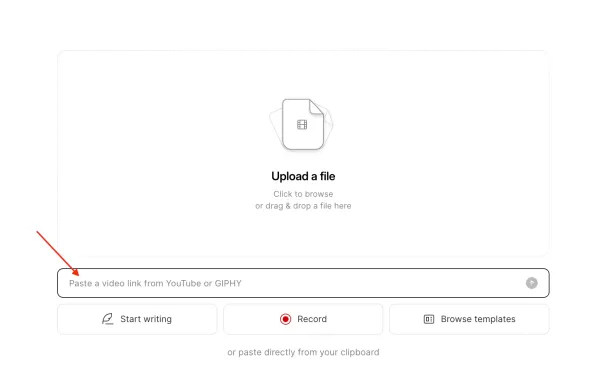
Step 1. Initiate a New Project and Insert the YouTube URL
In the primary Drive interface, click on "New Project" situated in the top right corner. After that, copy and paste the YouTube URL you have into the designated text box.
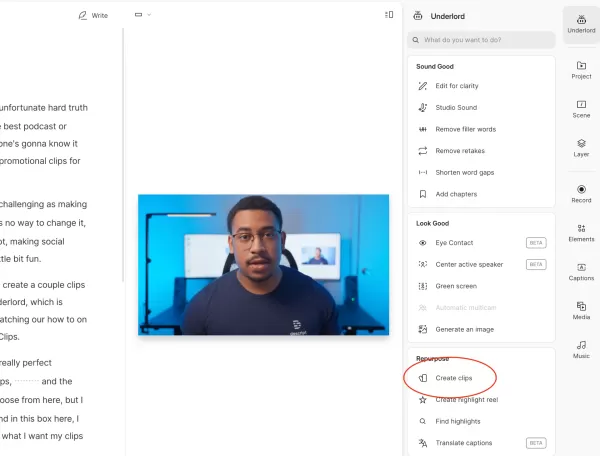
Step 2. Launch Underlord and Select “Create Clips”
Open Descript's AI assistant, Underlord, which is located in the upper right corner. Subsequently, scroll down and choose the option “Create clips”.
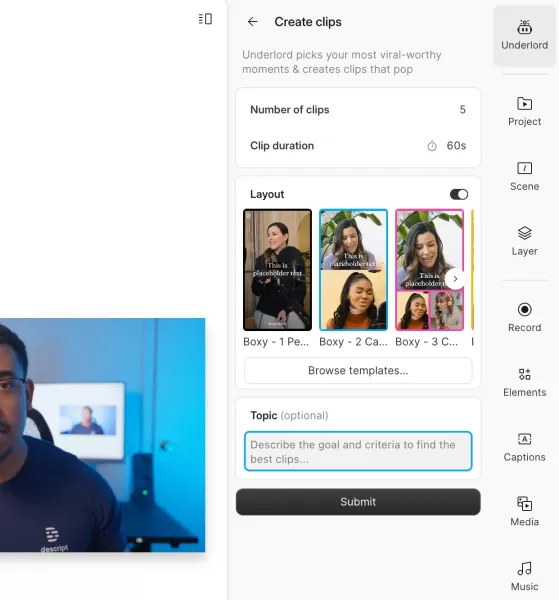
Underlord will present you with the opportunity to select a layout and allow you to provide instructions regarding the topics that it ought to concentrate on. Once you are content with the decisions you've made, click on the "Submit" button.
Step 3. Look Through Your Available Clip Options and Select Your Preferred One

Once you have completed the process of refining your captions, selecting appropriate colors, and incorporating your branding elements, click on the "Publish" button. Then, choose "YouTube" from the dropdown menu. After that, Descript will automatically upload and make your newly created clip available on your YouTube channel.
How to clip YouTube videos on mobile devices.
Step 1: Employ the Screen Recorder on Your Device
YouTube offers a clipping feature that can be utilized on both desktop and mobile platforms. However, the capabilities of this feature might be restricted on specific devices. In the event that you face such limitations, it would be advisable to make use of an external screen recording application to record the relevant content.
For the sake of simplicity, we will conduct this demonstration using an Apple iPhone or iPad:
First, open the Settings application.
Next, navigate to the Control Center.
Then, drag the Screen Recording option up into the Included Controls section.
In case you are recording on any other device, such as a Google Pixel phone or an Android device, please refer to this quickstart guide to activate the screen recording feature.

Step 2: Launch the YouTube Video for Clipping
Subsequently, open the YouTube video that you intend to create a clip from. While it is more convenient to carry out this step via the YouTube application, you also have the option to open YouTube within your web browser and start the recording process from there.
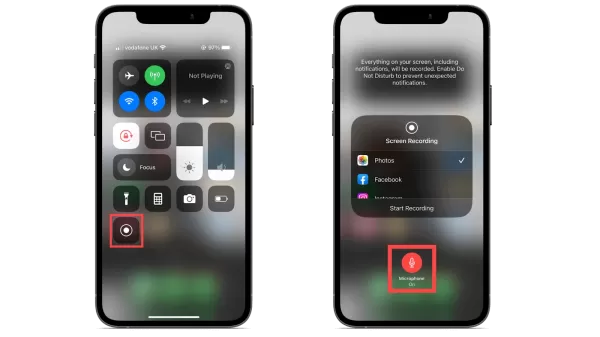
Step 3: Initiate Screen Recording
Now, it's the appropriate moment to begin creating the clip. Scroll through the video to locate the specific section you wish to record. Then, swipe down from the bottom of your device's screen to access the Control Center and find the screen recording button. Make sure to enable the "Do Not Disturb" mode. This step is crucial as it will prevent notifications from popping up and disrupting the recording of your video clip.
After you have completed the recording of your clip, click on the "End recording" option. The appearance of this button may vary across different devices. For instance, on an iPhone, it is the red timing button situated in the top right corner of the screen.
Step 4: Examine Your YouTube Video Clip
In most cases, smartphone operating systems store screen recordings in the device's Photos application. To locate your recorded clip, open the Photos app and filter the content to show only videos (it's likely that your clip will be the most recently added file). Once you've found it, you have the option to view it at a later time, edit it to your preferences, or share the YouTube video clip that you've just recorded with others.