Citrix Secure Hub - Secure work data
Access work resources securely from your Android device with Citrix Secure Hub.

- 25.1.0 Version
- 3.3 Score
- 1M+ Downloads
- Free License
- 3+ Content Rating
Citrix Secure Hub, formerly known as Worx Home, offers users direct access to their workspace for various mobile, web, virtual Windows, and SaaS applications. It enables single sign-on functionalities and ensures the implementation of security policies at both device and application levels.
- Unified access to all applications through a centralized interface
- Connects users to corporate resources securely
- Allows for seamless offline and online access
Administering Secure Hub
You perform most of the administration tasks related to Secure Hub during the initial configuration of Endpoint Management. To make Secure Hub available to users, for iOS and Android, upload Secure Hub to the iOS App Store and the Google Play Store.
Secure Hub also refreshes most MDX policies stored in Endpoint Management for the installed apps when a user’s Citrix Gateway session renews after authentication using Citrix Gateway.
Important:
Changes to any of these policies require that a user delete and reinstall the app to apply the updated policy: Security Group, Enable encryption, and Secure Mail Exchange Server.
Citrix PIN
You can configure Secure Hub to use the Citrix PIN, a security feature enabled in the Endpoint Management console in Settings > Client Properties. The setting requires enrolled mobile device users to sign on to Secure Hub and activate any MDX wrapped apps by using a personal identification number (PIN).
The Citrix PIN feature simplifies the user authentication experience when logging on to the secured wrapped apps. Users don’t have to enter another credential like their Active Directory user name and password repeatedly.
Users who sign on to Secure Hub for the first time must enter their Active Directory user name and password. During sign-on, Secure Hub saves the Active Directory credentials or a client certificate on the user device and then prompts the user to enter a PIN. When users sign on again, they enter the PIN to access their Citrix apps and the Store securely, until the next idle timeout period ends for the active user session. Related client properties enable you to encrypt secrets using the PIN, specify the passcode type for the PIN, and specify PIN strength and length requirements. For details, see Client properties.
When fingerprint (touch ID) authentication is enabled, users can sign on by using a fingerprint when offline authentication is required because of app inactivity. Users still have to enter a PIN when signing on to Secure Hub for the first time, restarting the device, and after the inactivity timer expires. For information about enabling fingerprint authentication, see Fingerprint or touch ID authentication.
Certificate pinning
Secure Hub for iOS and Android supports SSL certificate pinning. This feature ensures that the certificate signed by your enterprise is used when Citrix clients communicate with Endpoint Management, thus preventing connections from clients to Endpoint Management when installation of a root certificate on the device compromises the SSL session. When Secure Hub detects any changes to the server public key, Secure Hub denies the connection.
As of Android N, the operating system no longer allows user-added certificate authorities (CAs). Citrix recommends using a public root CA in place of a user-added CA.
Users upgrading to Android N might experience problems if they use private or self-signed CAs. Connections on Android N devices break under the following scenarios:
- Private/self-signed CAs and the Required Trusted CA for Endpoint Management option is set ON. For details, see Device management.
- Private/self-signed CAs and the Endpoint Management AutoDiscovery Service (ADS) are not reachable. Due to security concerns, when ADS is not reachable, Required Trusted CA turns ON even it was set as OFF initially.
Before you enroll devices or upgrade Secure Hub, consider enabling certificate pinning. The option is Off by default and managed by the ADS. When you enable certificate pinning, users cannot enroll in Endpoint Management with a self-signed certificate. If users try to enroll with a self-signed certificate, they are warned that the certificate is not trusted. Enrollment fails if users do not accept the certificate.
To use certificate pinning, request that Citrix upload certificates to the Citrix ADS server. Open a technical support case using the Citrix Support portal. Ensure that you don’t send the private key to Citrix. Then, provide the following information:
- The domain containing the accounts with which users enroll.
- The Endpoint Management fully qualified domain name (FQDN).
- The Endpoint Management instance name. By default, the instance name is zdm and is case-sensitive.
- User ID Type, which can be either UPN or Email. By default, the type is UPN.
- The port used for iOS enrollment if you changed the port number from the default port 8443.
- The port through which Endpoint Management accepts connections if you changed the port number from the default port 443.
- The full URL of your Citrix Gateway.
- Optionally, an email address for your administrator.
- The PEM-formatted certificates you want added to the domain, which must be public certificates and not the private key.
- How to handle any existing server certificates: Whether to remove the old server certificate immediately (because it is compromised) or to continue to support the old server certificate until it expires.
Your technical support case is updated when your details and certificate have been added to the Citrix servers.
Certificate + one-time-password authentication
You can configure Citrix ADC so that Secure Hub authenticates using a certificate plus a security token that serves as a one-time password. This configuration provides a strong security option that doesn’t leave an Active Directory footprint on devices.
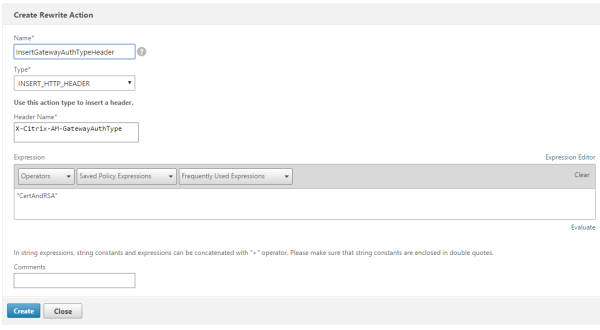
To enable Secure Hub to use the certificate + one-time-password type of authentication, do the following: Add a rewrite action and a rewrite policy in Citrix ADC that inserts a custom response header of the form X-Citrix-AM-GatewayAuthType: CertAndRSA to indicate the Citrix Gateway logon type.
Ordinarily, Secure Hub uses the Citrix Gateway logon type configured in the Endpoint Management console. However, this information isn’t available to Secure Hub until Secure Hub completes logon for the first time. Therefore, the custom header is required.
Note:
If different logon types are set for Endpoint Management and Citrix ADC, the Citrix ADC configuration overrides. For details, see Citrix Gateway and Endpoint Management.
1. In Citrix ADC, navigate to Configuration > AppExpert > Rewrite > Actions.
2. Click Add.
The Create Rewrite Action screen appears.
3. Fill in each field as shown in the following figure and then click Create.
The following result appears on the main Rewrite Actions screen.

4. Bind the rewrite action to the virtual server as a rewrite policy. Go to Configuration > NetScaler Gateway > Virtual Servers and then select your virtual server.
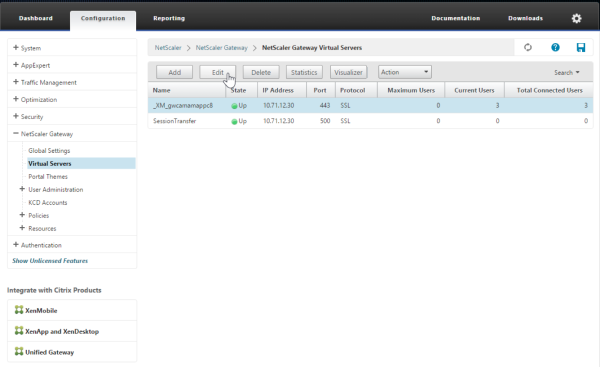
5. Click Edit.
6. On the Virtual Servers configuration screen, scroll down to Policies.
7. Click + to add a policy.
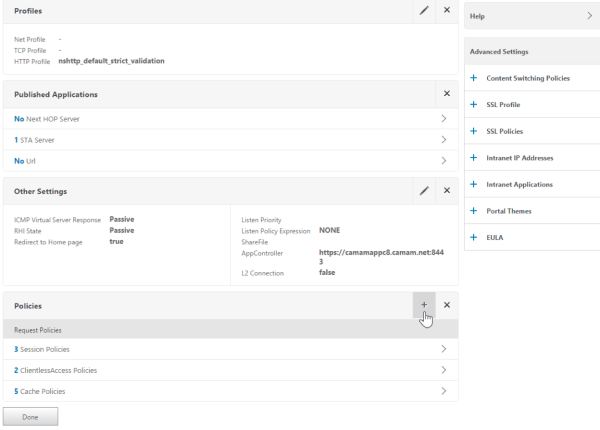
8. In the Choose Policy field, choose Rewrite.
9. In the Choose Type field, choose Response.
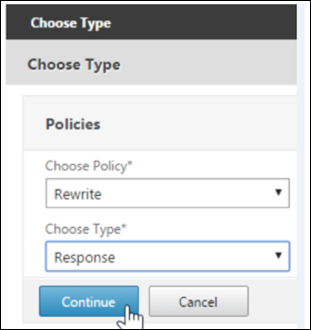
10. Click Continue.
The Policy Binding section expands.
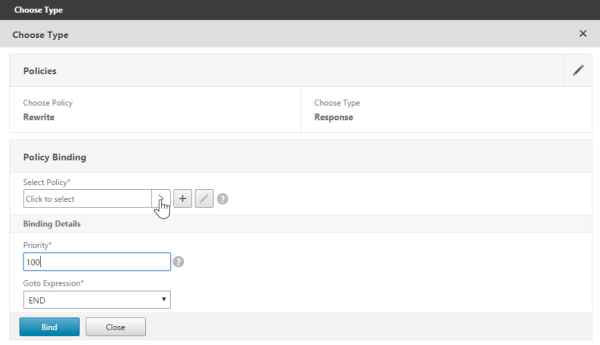
11. Click Select Policy.
A screen with available policies appears.

12. Click the row of the policy you created and then click Select. The Policy Binding screen appears again, with your selected policy filled in.
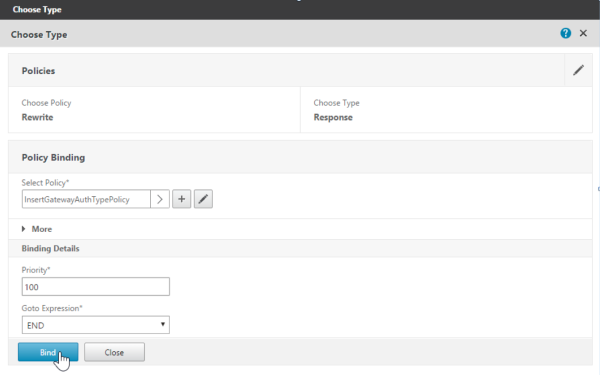
13. Click Bind.
If the bind is successful, the main configuration screen appears with the completed rewrite policy shown.
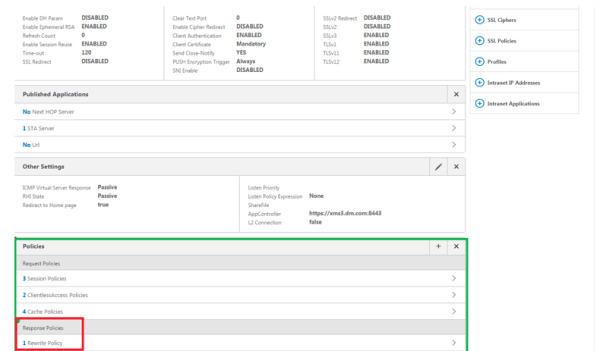
14. To view the policy details, click Rewrite Policy.

User Guide
Using Secure Hub
Users begin by downloading Secure Hub on to their devices from the Apple or Android store.
When Secure Hub opens, users enter the credentials provided by their companies to enroll their devices in Secure Hub. For more details about device enrollment, see User accounts, roles, and enrollment.
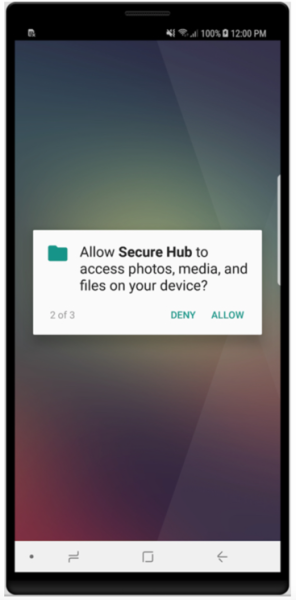
On Secure Hub for Android, during initial installation and enrollment, the following message appears: Allow Secure Hub to access photos, media, and files on your device?
This message comes from the Android operating system and not from Citrix. When you tap Allow, Citrix and the admins who manage Secure Hub do not view your personal data at any time. If however, you conduct a remote support session with your admin, the admin can view your personal files within the session.
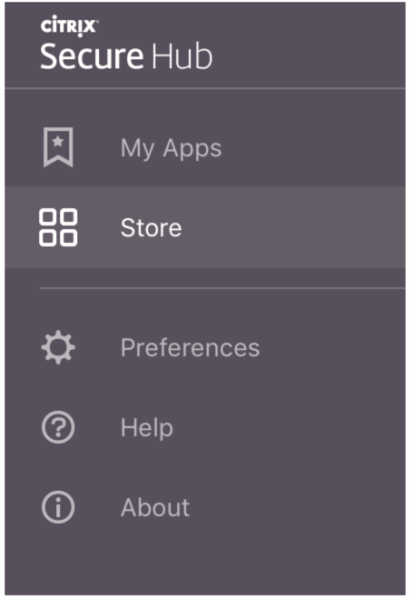
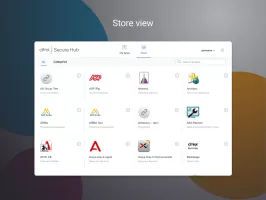
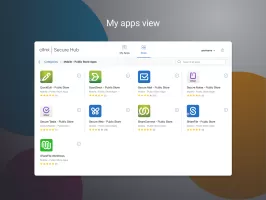
Once enrolled, users see any apps and desktops that you’ve pushed in their My Apps tab. Users can add more apps from the Store. On phones, the Store link is under the Settings hamburger icon in the upper left-hand corner.
On tablets, the Store is a separate tab.
When users with iPhones running iOS 9 or later install mobile productivity apps from the store, they see a message. The message states that the enterprise developer, Citrix, is not trusted on that iPhone. The message notes that the app is not available for use until the developer is trusted. When this message appears, Secure Hub prompts users to view a guide that coaches them through the process of trusting Citrix enterprise apps for their iPhone.
Automatic enrollment in Secure Mail
For MAM-only deployments, you can configure Endpoint Management so that users with Android or iOS devices who enroll in Secure Hub using email credentials are automatically enrolled in Secure Mail. Users do not have to enter more information or take more steps to enroll in Secure Mail.
On first-time use of Secure Mail, Secure Mail obtains the user’s email address, domain, and user ID from Secure Hub. Secure Mail uses the email address for AutoDiscovery. The Exchange Server is identified using the domain and user ID, which enables Secure Mail to authenticate the user automatically. The user is prompted to enter a password if the policy is set to not pass through the password. The user is not, however, required to enter more information.
To enable this feature, create three properties:
- The server property MAM_MACRO_SUPPORT. For instructions, see Server properties.
- The client properties ENABLE_CREDENTIAL_STORE and SEND_LDAP_ATTRIBUTES. For instructions, see Client properties.
Customized Store
If you want to customize your Store, go to Settings > Client Branding to change the name, add a logo, and specify how the apps appear.
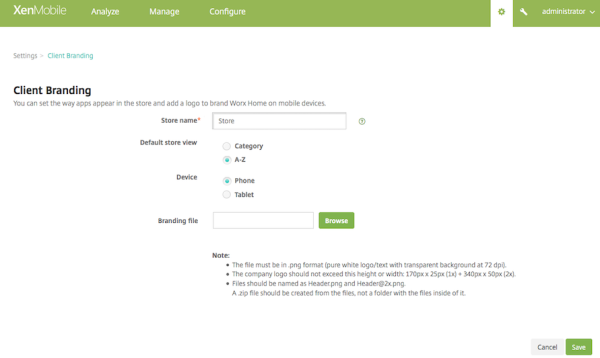
You can edit app descriptions in the Endpoint Management console. Click Configure then click Apps. Select the app from the table and then click Edit. Select the platforms for the app with the description you’re editing and then type the text in the Description box.

In the Store, users can browse only those apps and desktops that you’ve configured and secured in Endpoint Management. To add the app, users tap Details and then tap Add.
- Version25.1.0
- UpdateFeb 14, 2025
- DeveloperCitrix
- CategoryBusiness
- Requires AndroidAndroid 7.0+
- Downloads1M+
- Package Namecom.zenprise
- Signaturea27318d2fd406f55487a380f46bb348c
- Available on
- ReportFlag as inappropriate
-
NameSizeDownload
-
28.61 MB
-
28.60 MB
-
28.54 MB










takes total control of the phone
Attachments fail to open frequently
Messages hang in the outbox
Randomly requires to log back