Image Combiner & Editor - Merge & Edit Photos
Merge and edit photos seamlessly with this versatile image combiner app.

- 2.0670 Version
- 4.2 Score
- 2M+ Downloads
- In-app purchases License
- 3+ Content Rating

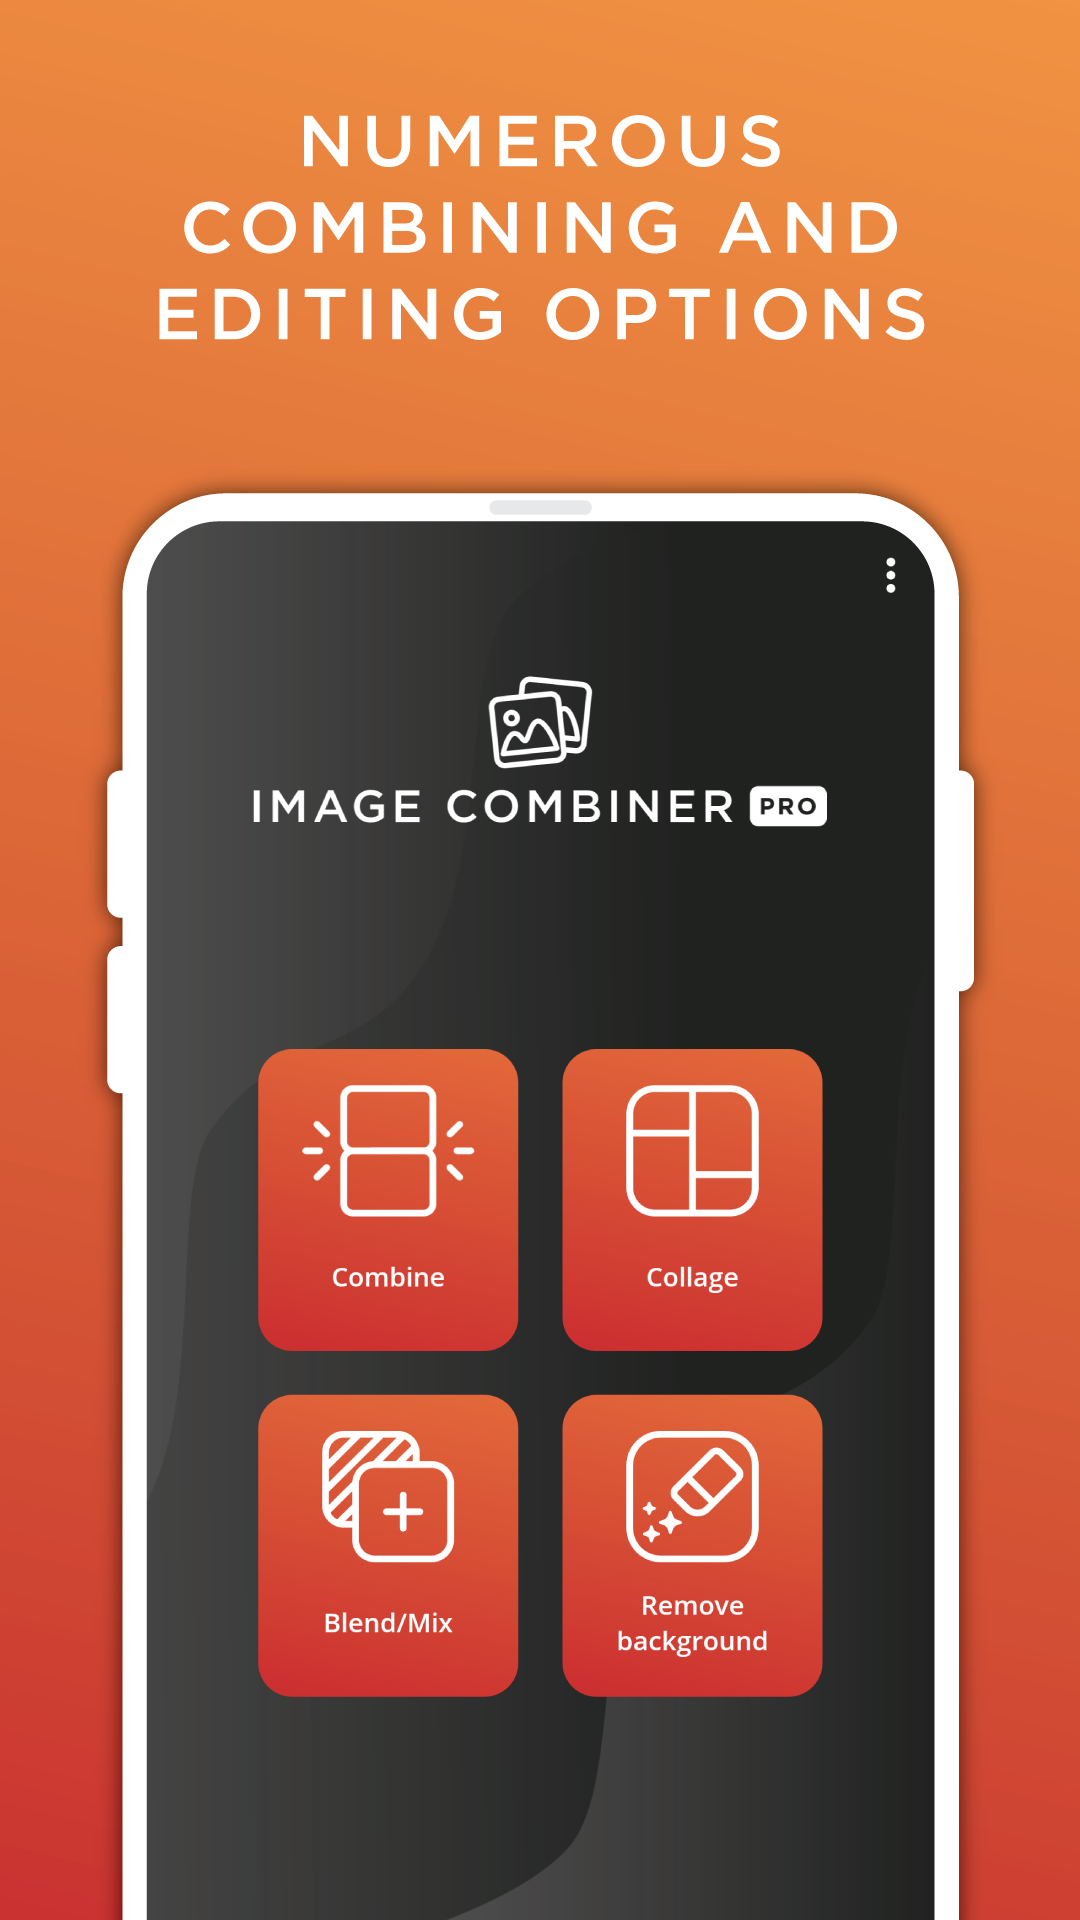

Introducing Image Combiner & Editor
Welcome to Image Fusion & Editor, the ultimate tool for merging multiple images and expressing your creativity through robust editing functions. Whether you're an experienced designer or simply aiming to enhance your social media presence, our application provides a user-friendly interface loaded with powerful features to bring your ideas to life.
Main Features:
🖼️ Effortless Image Fusion:
Easily combine multiple images vertically or horizontally. Our intuitive layout selection enables you to arrange your photos exactly as you envision.
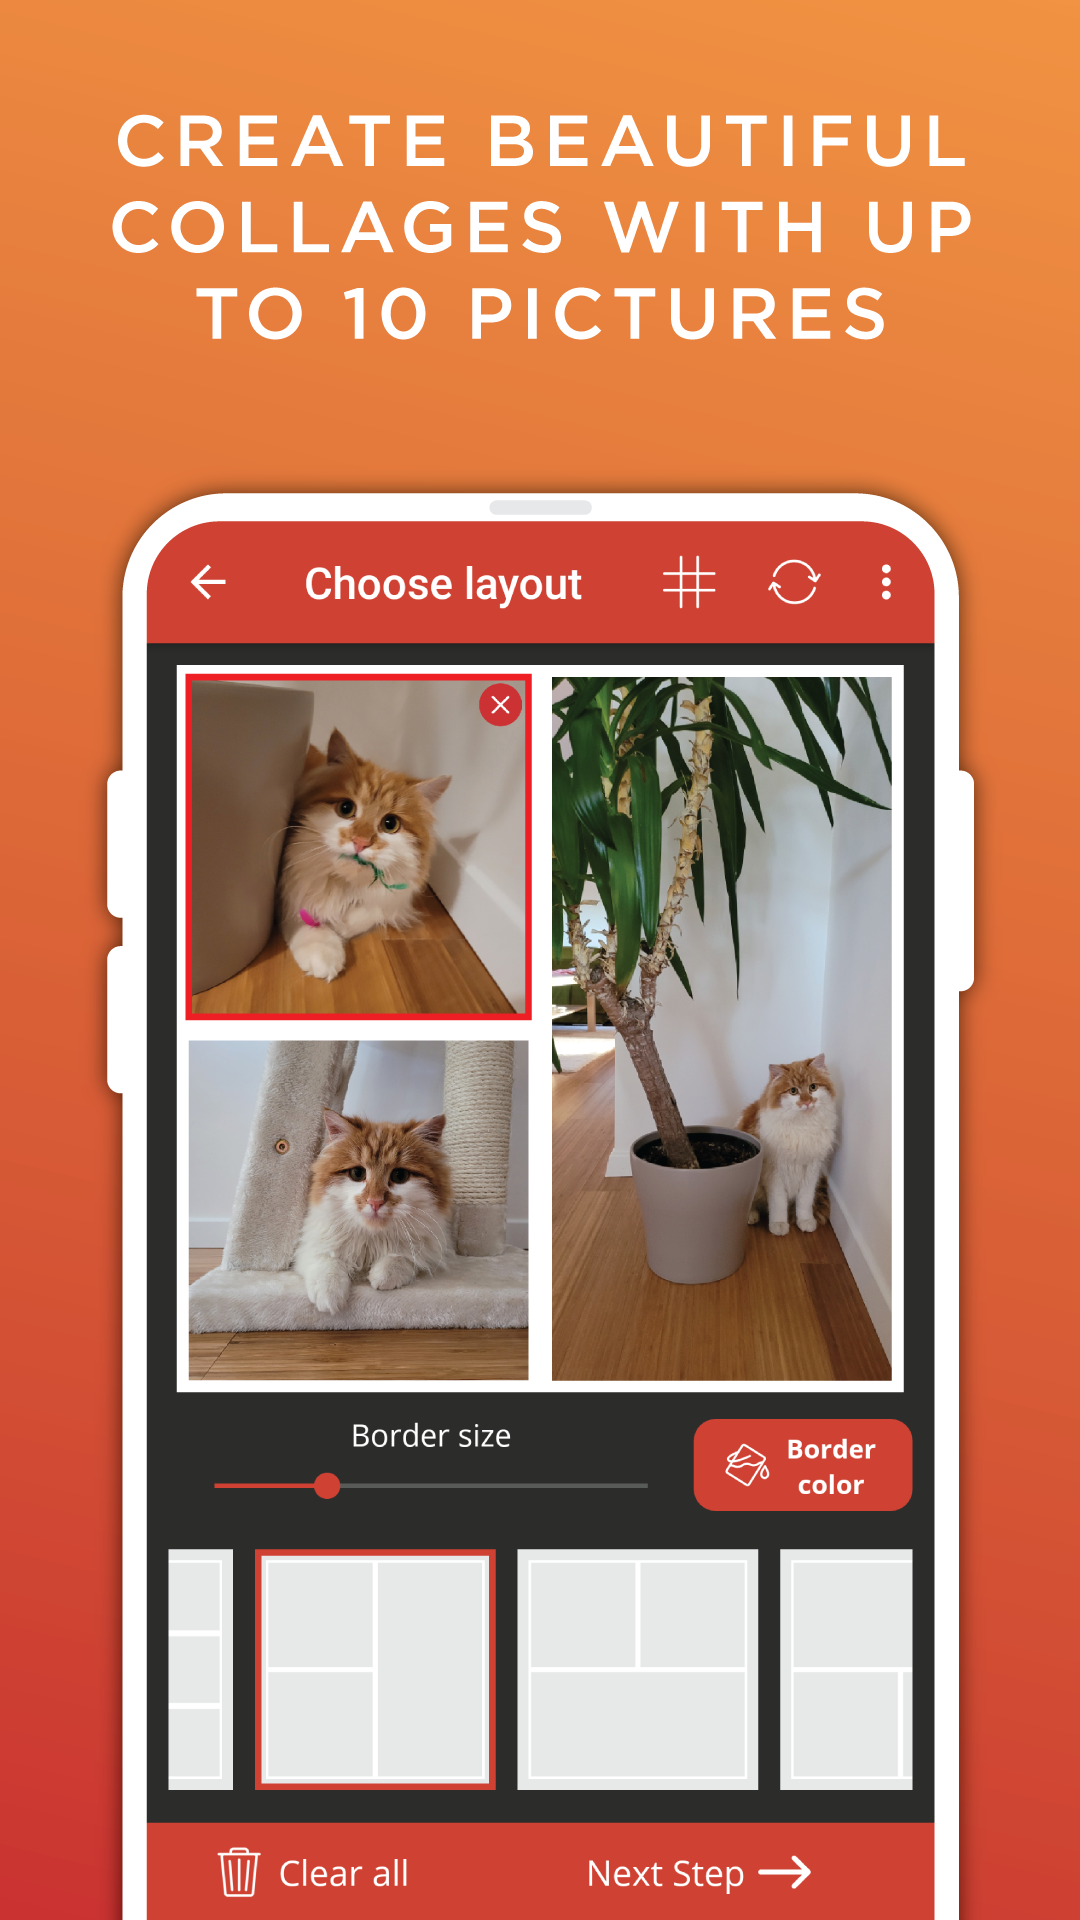
🎨 Collage Crafting:
Quickly turn your images into captivating collages with just a few taps. Choose from a variety of collage layouts to suit your style and project requirements.
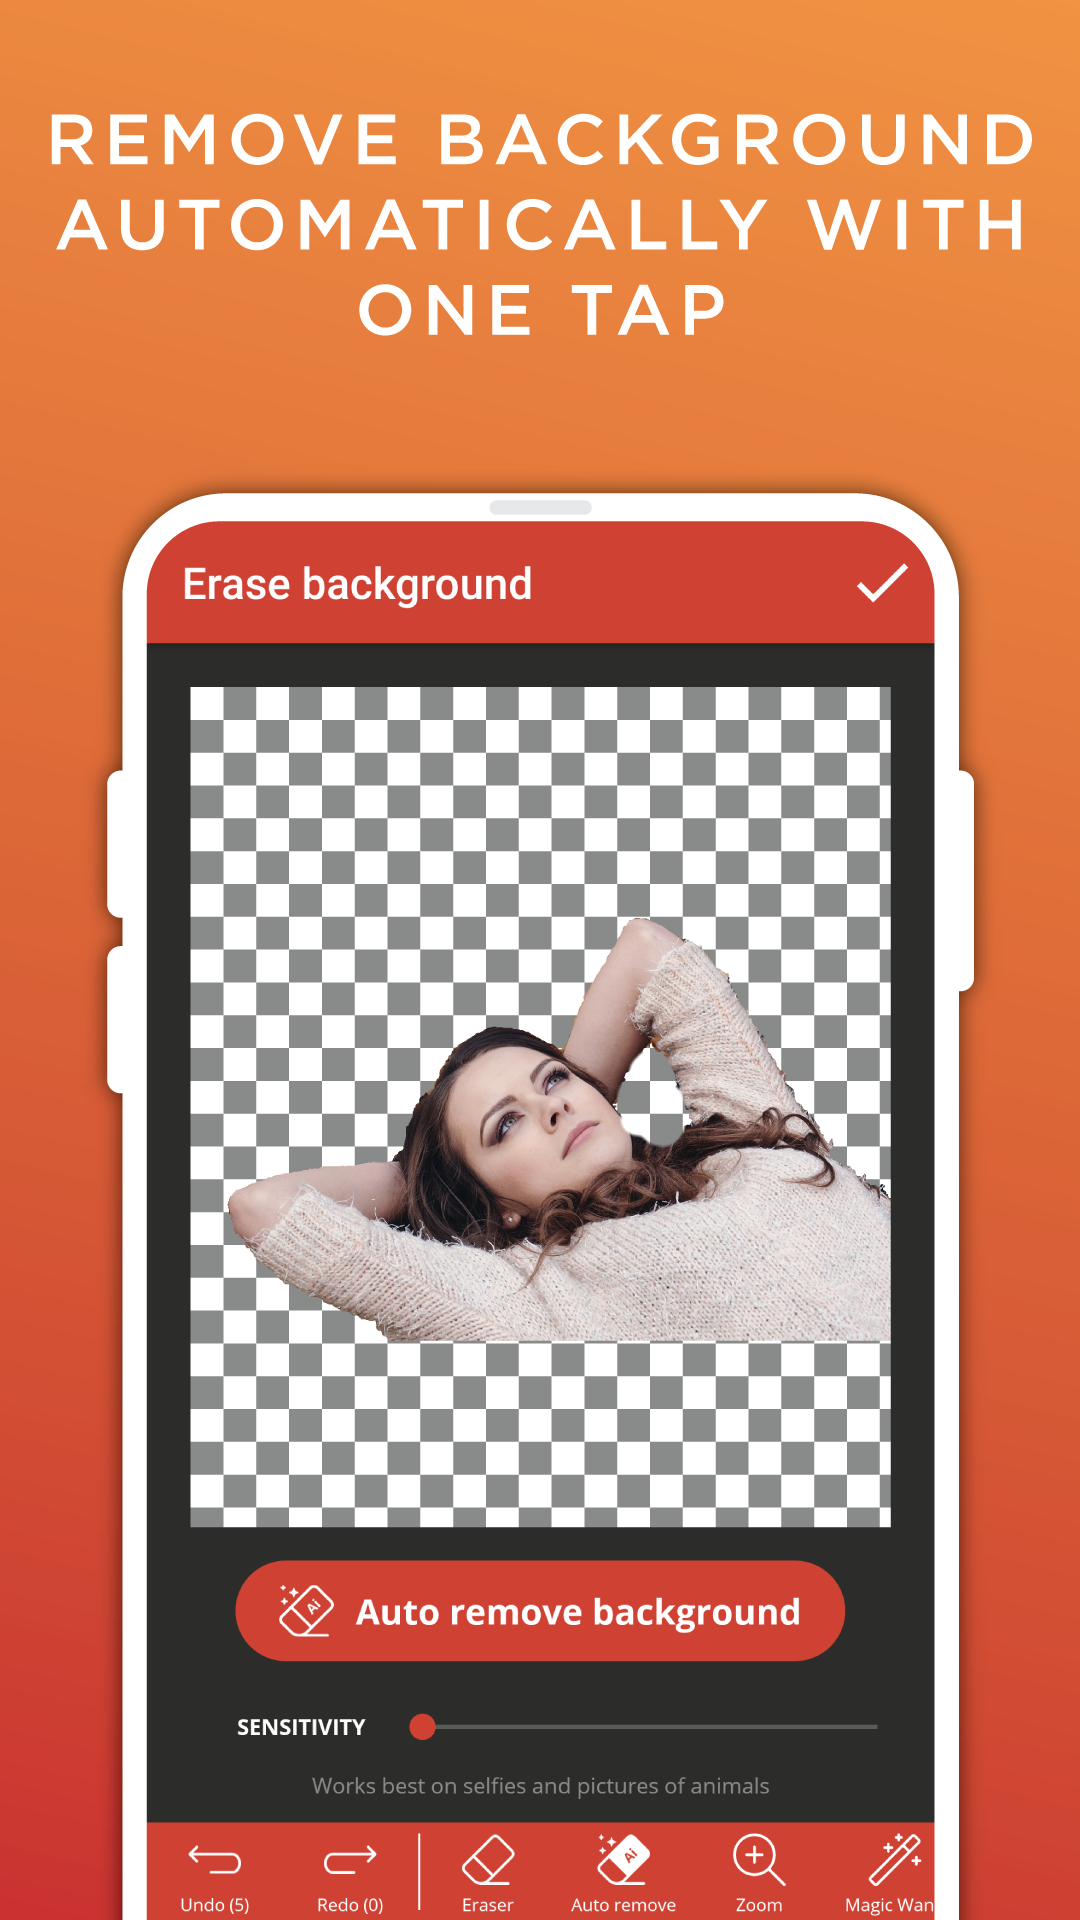
🧙 AI Background Remover:
Bid farewell to laborious manual erasing! Our One Tap AI Background Remover smoothly eliminates backgrounds, providing your images with a professional touch in seconds.
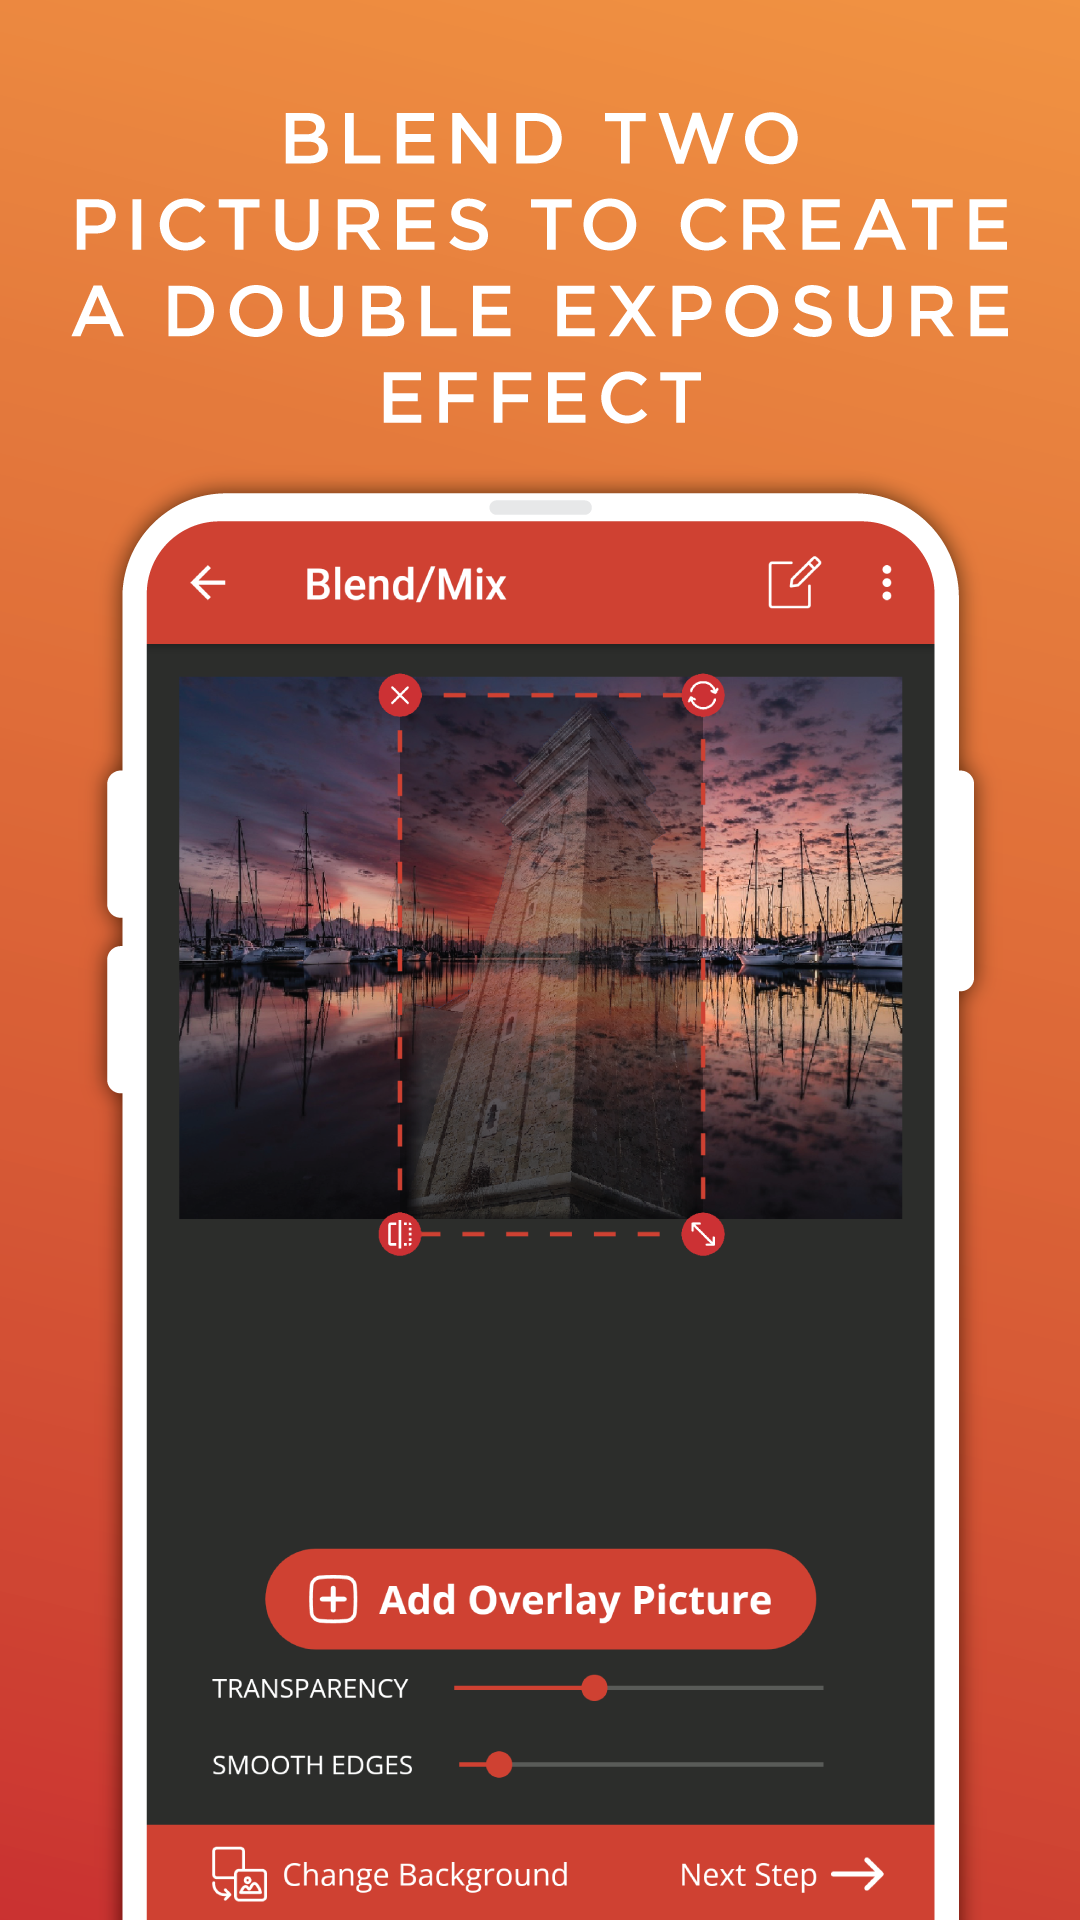
🌟 Double Exposure Effects:
Blend two or more photos to create mesmerizing double exposure effects. Unleash your creativity and generate stunning visuals with minimal effort.
📷 Access to Free Stock Photos:
Seamlessly browse millions of premium stock photos via Pixabay integration. Enhance your compositions with a vast collection of free images at your disposal.
🔄 Background Replacement:
Effortlessly swap backgrounds on any photo to personalize your compositions and add depth to your creations.
🛠️ Automatic Background Removal:
Seamlessly merge images while automatically eliminating backgrounds for a refined, professional look.
🔍 Efficient Sorting:
Easily organize your images by name for smooth navigation and management.
📤 Simple Sharing and Saving:
Share your masterpieces directly from the app or save them to your device with a single tap.
📊 Picture Quality Control:
Fine-tune the quality of your images to ensure they appear flawless wherever you choose to share them.
✂️ Image Cropping:
Crop selected images to emphasize key elements and achieve impeccable composition.
🔄 Image Adjustment Choices:
Merge images of varying sizes with various adjustment options for a seamless outcome.
🌟 Lightweight and User-Friendly:
Our application is designed to be lightweight and simple to navigate, enabling you to focus on expressing your creativity effortlessly.
🎨 Exquisite Design:
Immerse yourself in a visually appealing interface that enriches your editing experience and sparks your imagination.
🔒 Your Privacy is Important:
Relax knowing that Image Fusion values your privacy. We DO NOT automatically upload any images that you share, create, or import. Your data remains yours.
Photo Editing Basics
from REI: Expert Advice
Once you've got the hang of understanding your camera, exposure basics and how to compose a great photo it's time to learn a few photo editing essentials to put the finishing touches on your artistic vision. The steps below will get you started on the photo editing process right away. You'll also find things to think about before you begin editing at the end of this article.
The basic photo editing techniques should be available in even simple editing programs, and each can enhance your images to make them more powerful and shareworthy. Advanced editing software will offer these basic tools and will also include refinements that allow you to do more sophisticated editing that's outside the scope of this article. You don't have to do all of the basic editing steps on every image, but the steps you choose to do should be done in the order listed.
The easiest photos to edit, of course, are ones taken by a skilled photographer who takes time to get exceptional shots in the field. (You'll also want to consider shooting in RAW image format for the greatest editing control. Read Understanding Your Camera to learn more about RAW vs. JPG image formats. You should also be certain your editing program can work with RAW images.) To start learning how to get the best shots, consider taking a hands-on photography course.
1. Crop and Clean Up Your Images
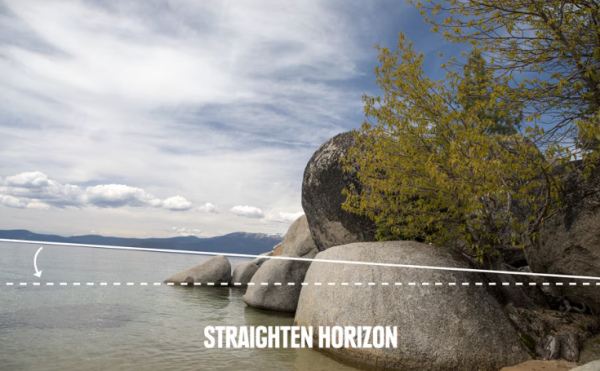
Straighten images: It's always better to pay attention to be sure your horizon is horizontal when you shoot, but straightening is also an easy first editing step.
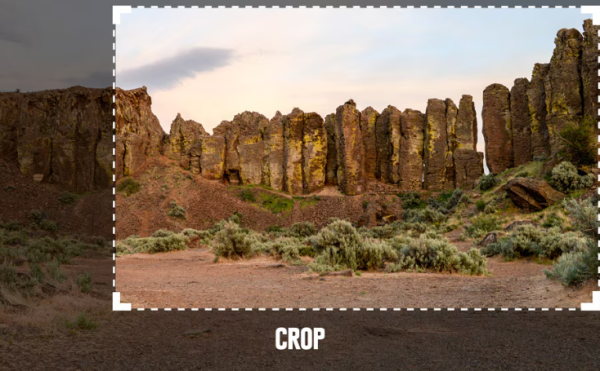
Crop images: It's best to crop to improve minor compositional details, like distracting elements at the edge of the frame or repositioning your subject slightly.
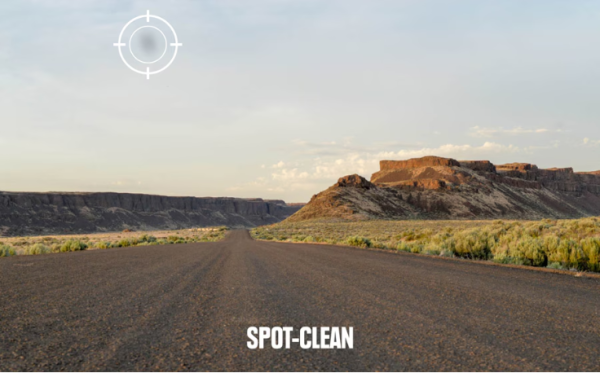
Spot-clean images: The outdoors is a dusty place and nature's gritty elements have a way of finding their way onto your camera lens, and then onto your photos. (Using a lens brush regularly in the field cuts down on this.)
Most editing programs have a spot-removing tool. The name varies: "clone stamping" and "spot healing" are two variations. Programs also let you change your view of a photo to highlight the location of spots. Work your way methodically around your photo until you have a spot-free image.
2. Adjust the White Balance
White balance relates to color levels, not exposure levels. If your image has an overall color tone that you find displeasing or unnatural, you can adjust white balance to fix it. Note that JPG files, because they capture far less digital data than RAW files, offer a minimal amount of white balance adjustment during editing.
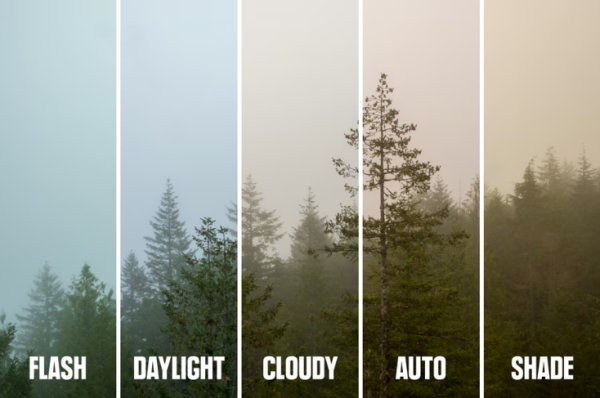
Most editing programs let you pick from preset modes like "flash," "daylight" or "cloudy" to better calibrate the image for the lighting conditions when it was shot. In addition, many have both a "temperature" and a "tint" slider that you can fiddle with to fine-tune the overall lighting cast on an image.

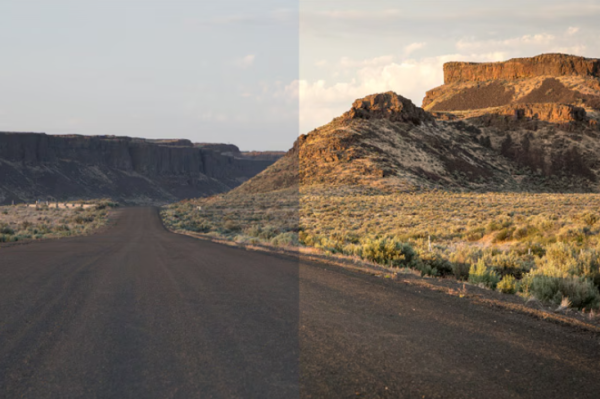
3. Adjust Exposure and Contrast
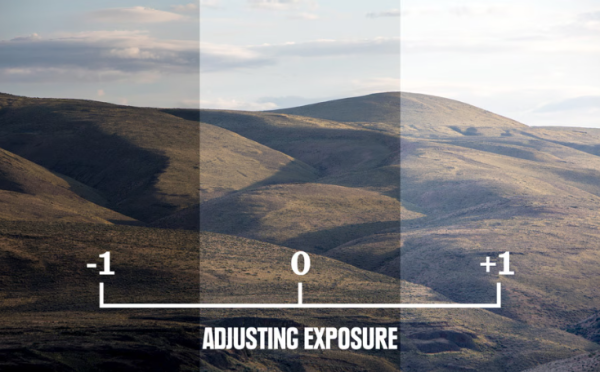
Adjusting exposure: This is the process of making the photo exactly as bright or dark as you want. Note that "noise" (a mottled look) can sometimes be introduced when you crank up the brightness. That's why it's always better to get the correct exposure (one that's sufficiently bright) when you first take the photo.
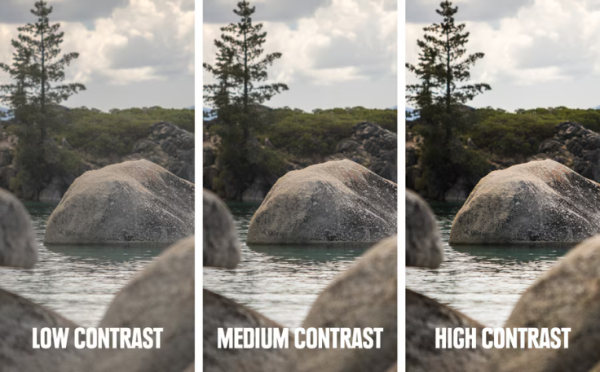
Adjusting contrast: Contrast is the range of dark to light tones. When it's extra high, you see a stark image, where all tones, regardless of color, are either very dark or very light. When it's extra low, you see a flat image where no elements in the frame stand out. Typically, you want a middle contrast that avoids either of those extremes. But if you prefer either of those effects, you can adjust the contrast to achieve that.
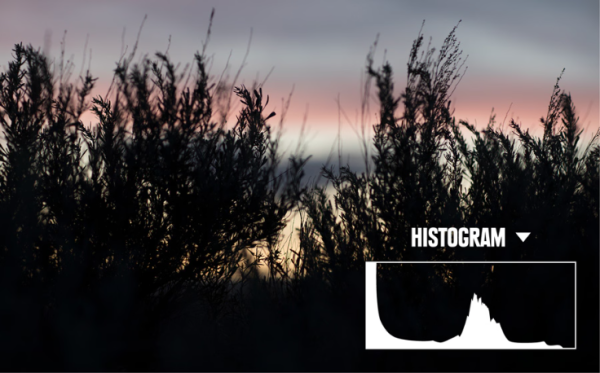
How to use the photo histogram: This graphic representation of the tonal range of a photo helps you optimize final exposure levels during editing. You don't always need to look at the histogram, but it can be helpful when a shot has a large amount of dark area or a large amount of light area. Many editing programs include it on the screen where you adjust exposure, making it easy to reference. A well-exposed photo would give you tones throughout the range from dark to light with more tones grouped in the middle:
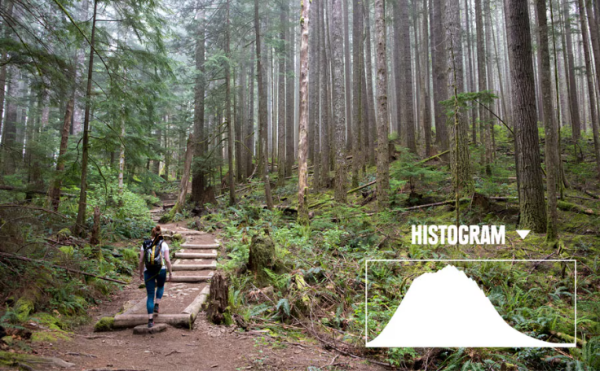
Your goal isn't to always take photos with a histogram like the one above: Evenness of the lighting on the subject largely determines that.
When you have a spike on the left side of the histogram, though, that indicates your photo has a lot of darker tones:
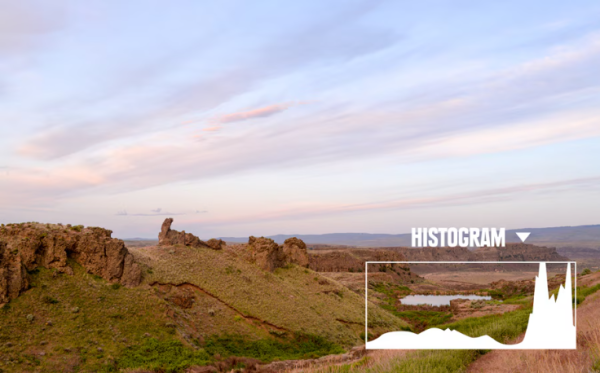
When you have a spike on the right side of the histogram, that indicates your photo has a lot of lighter tones:
You can also eyeball exposure as you edit, but a histogram can be an incredibly useful tool, especially if you get in the habit of looking at it regularly. Here's an example of the same two photos and their histograms after adjusting the exposure during editing:
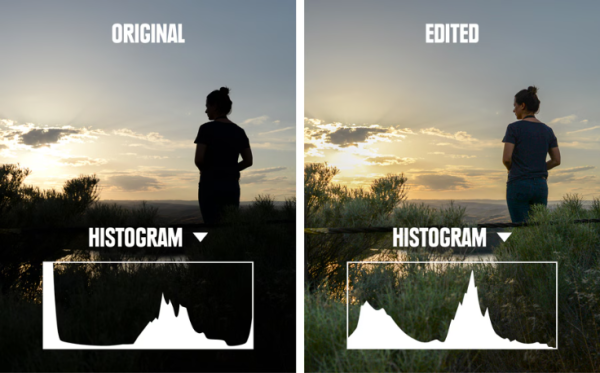
Note that a histogram can also be useful when you're shooting photos. The backlit LED screen on your camera can be hard to see and often makes images look brighter than they truly are. If you look at the histogram on a tricky exposure, you can then adjust exposure settings to get a fuller range of tones, as well as enough tones in both the dark and light areas of the histogram. (Again, the closer you get to a good exposure in the field, the less time you'll spend editing for exposure later.)
4. Adjust Color Vibrancy and Saturation
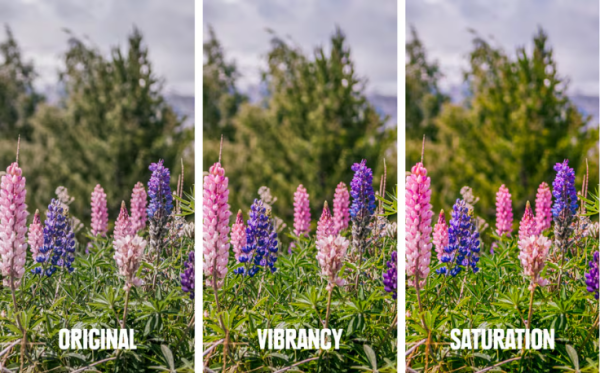
Once white balance is adjusted, you can further refine colors in your photos with the saturation and vibrancy controls. The distinction between the two is subtle: Increasing vibrancy increases color intensity in neutral color tones and maintains color intensity in the brighter colors. Increasing saturation makes all colors throughout the frame more intense. When bright colors pop, it can give the photo a more dramatic look.
5. Adjust Sharpness
Sharpening an image gives it a crisper, cleaner look. Many programs offer multiple sharpening tools. Begin by adjusting the overall amount of sharpness (on a scale from 0 to 100). Start at 50 percent, then adjust the level up or down to get the sharpness you prefer.
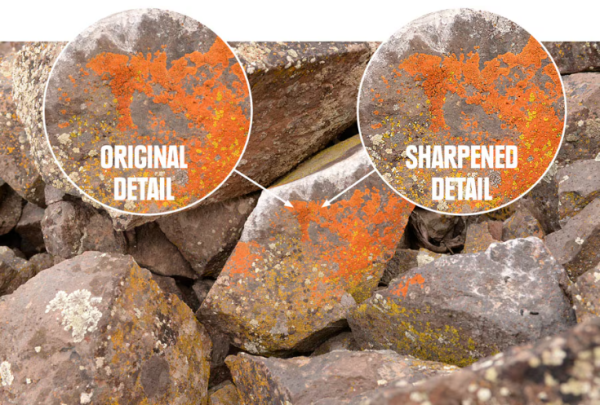
Experiment with your editing program's additional sharpening features to see the effect each produces. One you might try is a "clarity" or "structure" tool. It makes the edges of objects in the photo stand out more, giving the overall image a punchier look.
You need to look closely at individual areas of the frame in order to evaluate the effect of each sharpness adjustment. Having super-fine details won't matter much for social media posts, but it will make a big difference for any image you plan to enlarge and print.
Note that sharpening an image can't turn an out-of-focus shot into an in-focus shot. No editing tool can do that. In addition, if you sharpen an image too much you can create an unnatural halo effect around objects in the frame.
6. Finalize and Share Your Photos
After you've done all of your editing, set your photos aside. Then come back later and examine them to see if you're happy with each one. If not, make additional editing adjustments where needed.
Then, because RAW files are so large, you need to convert them to JPGs before you email, post, share or print your edited photos. You should also save all of the final edited versions of images alongside the original images they came from.
Things to Think About Before You Begin Editing
Photo editing programs: Options include advanced and expensive pro programs, free open-source online options, and often your camera comes with basic editing software as well. If you get a more advanced program, consider whether you want one that's cloud-based (a monthly fee) or you want the standalone version (a one-time purchase price). Cloud-based programs stay up to date, and let you store photos in the cloud (an added expense). You can also edit in the field with a tablet or a mobile version of the software, but that assumes you have online connectivity. If you compare pricing over time, though, buying a standalone version of an editing program will usually save you money.
Understand the difference between "nondestructive" and "destructive" editing: Some editing software automatically preserves your originals—nondestructive editing. Others save edited images over originals—destructive editing. Editing involves trial and error, and you need to be able to return to an original file if you make a mistake. So make sure you know if your editing program makes copies of your originals. If it doesn't, then make a copy of all images you plan to edit before you begin.
Importing and Sorting Photos: A beautiful thing about digital photography is you can take multiple shots to increase the odds of getting some spectacular ones. So, your first step after you transfer and organize your images on your computer is to review them to decide which ones to edit.
- Version2.0670
- UpdateSep 04, 2024
- DeveloperZomboDroid
- CategoryPhotography
- Requires AndroidAndroid 5.1+
- Downloads2M+
- Package Namecom.zombodroid.imagecombinerfree
- Signatureec95262e521429b753038f1cdf75bc91
- Available on
- ReportFlag as inappropriate
-
NameSizeDownload
-
61.71 MB
-
51.04 MB
-
51.04 MB


sufficient for clipping and combining
arrange images in a grid
stitch photos vertically
no compromising resolution or doing any weird cropping
"Duplicate" button waits to come
line up properly is difficult sometime