NoteCam Lite - Photo & location notes
Geo-tag your photos with notes, perfect for travelers and explorers.
- 5.19 Version
- 4.2 Score
- 9M+ Downloads
- Free License
- 3+ Content Rating
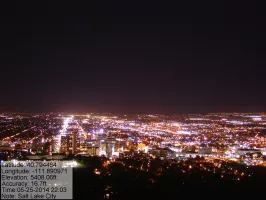
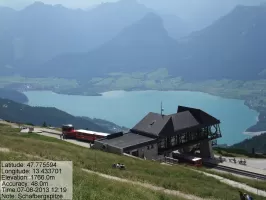
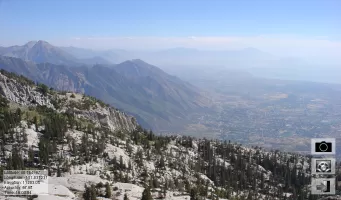
Ever experienced forgetting a location or person in a photo? NoteCam Lite offers a solution. It integrates GPS data (latitude, longitude, altitude, and accuracy), time, and notes with camera functionality. This allows users to add captions, merging all details into the image itself. By simply browsing the photos, one can readily access location and associated information.
■ Contrasting "NoteCam Lite" and "NoteCam Pro":
NoteCam Lite is a complimentary application; whereas, NoteCam Pro requires payment.
NoteCam Lite includes a "Powered by NoteCam" watermark in the bottom right of photos.
NoteCam Lite restricts photo size to 2048x1536 pixels, while NoteCam Pro has no size limit.
Original photos are not saved in NoteCam Lite, resulting in text-free images and longer storage times.
NoteCam Lite permits commentary in 3 columns compared to NoteCam Pro's 10 columns.
Retains the last 10 comments in NoteCam Lite, while NoteCam Pro maintains the last 30 comments.
Notable features exclusive to NoteCam Pro include text watermark, graphic watermark, and graphic center point.
Users can import custom font files in NoteCam Pro.
NoteCam Pro operates without advertisements.
Quick Start Guide
(1) Open NoteCam, and then click button to take a picture.
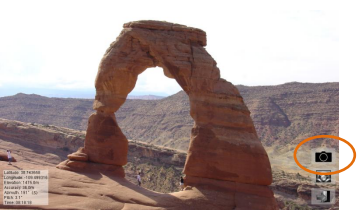
(2) Leave a message, and save it.

(3)The picture has been saved on your mobile device. The file location is under the primary external storage directory + /DCIM/NoteCam/directory.

User Manual
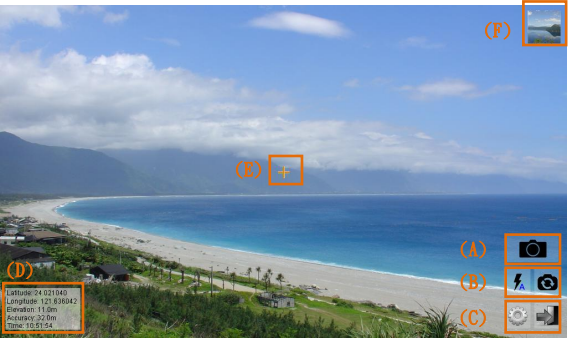
Like other camera applications, you can see a preview screen while opening NoteCam. The lower-left corner of the screen displays GPS and time information. The lower-right corner has five buttons. They mean “taking a picture,” “flashlight switch,” “camera lens switch,” “setting,” and “exit.”
(A) Taking a picture
Press this button will take a picture. You can leave a message or modify information while pressing the button. The picture will be saved after pressing “Save” button.
(B1) Flashlight switch
Provide flash switching function. The icon will not be displayed if there is no flash.
(B2) Camera lens switch
Provide the camera lens switching function. The icon will not be displayed if there is only one camera lens.
(C1) Settings
The settings can be divided into two parts. The basic settings include “photo setting,” “preview setting,” “camera setting,” “storage setting,” “text setting,” and “orientation setting.” The format settings include “unit type setting,” “GPS coordinates setting,” and “date/time setting.” When you first use this application, we recommend that you adjust the settings.
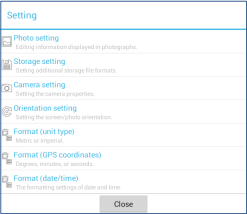
(i) Photo setting
The photo setting let you edit information which you want to display in photographs. It includes your comment, GPS information, date/time information, etc. The details are described below.
Display photo note: Display or hide user note in photographs.
Display GPS latitude: Display or hide GPS latitude.
Display GPS longitude: Display or hide GPS longitude.
Display GPS altitude: Display or hide GPS altitude.
Display GPS accuracy: Display or hide GPS accuracy.
Display time: Display or hide date/time information. You can set its format on the “format (date/time).”
Display central point: Display or hide a central point in photographs. The default value is "Do not display" the central point. If you want to display it, you can choose from "0.25x (small)" to "5.0x (large)" depending on the size of the central point. Moreover, if you do not like our point, you can design a square PNG file, and put it in the current storage directory. The file name should be center.png. For example, the path is /DCIM/NoteCam/center.png. As for the resolution size of the PNG file, it is recommended to be "photo size pixels" * "0.025" * "magnification." For example, the photo is 4000x3000 pixels and the center point is "5.0x (large)." Hence, it should be 4000*0.025*5=500. The PNG file size is 500x500 pixels. A small file will cause the image blurred. A too large file will not only slow down the storage speed, but may even crash due to lack of memory.
Photo size: Set photo resolution. The default value is 2048x1536 pixels. Depends on your mobile device, this value may be smaller. If a resolution shows “(Non-recommended),” it means this photo size is too small or too large.
Attention: Photographs require post processing. If picture size (number of pixels) is too large, it may cause incomplete pictures. Moreover, the application may be interrupted if the system does not have enough resource.
(ii) Preview setting
Set the preview screen to be displayed when you press the camera button. There are three modes.
Standard mode: You can only set the “photo note” here. In addition, in the “recent notes,” there are Google Geocoding address information (The GPS coordinate position is required) and the last ten notes. It provides you with a quick selection.
Full mode: It shows the complete input mode. It is for advanced users.
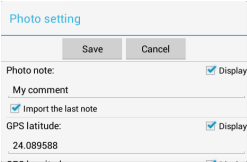
If the checkbox “Import the last note” is toggled on (checked), the last note will be imported when you take next picture. Saved pictures display the information which you’re interested in the lower-left corner. If you don’t want to display some information, you can unchecked the right side checkboxes “Display.” Also, you can modify information if you don’t like it.
Quick mode: Quick mode indicates you cannot leave a note while taking a picture, but you can leave a message here.
Photo note: Quick mode cannot leave a note while taking a picture. Hence, please leave a note here.
(iii) Camera setting
The camera setting let you set camera properties. The details are described below.
Camera ID: Set camera ID such as back-facing camera, front-facing camera, or other cameras.
Photo size (the same as “photo size” on the “photo setting”): Set photo resolution. The default value is 2048x1536 pixels. Depends on your mobile device, this value may be smaller. If a resolution shows “(Non-recommended),” it means this photo size is too small or too large.
Attention: Photographs require post processing. If picture size (number of pixels) is too large, it may cause incomplete pictures. Moreover, the application may be interrupted if the system does not have enough resource.
Flash mode: Sets the flash mode. If you do not choose “off” or “auto,” the mode will set “off” after closing app.
Camera shutter sound: Set camera shutter sound. You can uncheck the option to turn off camera sound into silent mode.
Attention: Some mobile devices may not be able to close this sound because of the factory setting.
(iv) Storage setting
You can change the storage directory here. Moreover, when taking pictures, the system saves pictures with information which you’re interested. If you want to save other storage file formats, you can set them here.
Storage directory: The default storage directory is /DCIM/NoteCam/. If you want to save in a different directory, you can change it here.
Attention: If you use the card as Portable Storage, we do not recommend that you store your photographs on the SD card. Because the photographs can only be stored in the specified path, when you remove this APP, all the data in this path will be deleted by the Android system. You will need to move the photographs to another directory before removing the APP, otherwise the photographs will be lost.
Save original file: Save additional files for original pictures.
Save text file (per photo): Save additional files for text information. Each photo has a text file.
Save text file (per day): Save additional files for text information. There is only one text file a day.
Save text file (per month): Save additional files for text information. There is only one text file in a month.
Save csv file (per photo): Save additional files for csv information. Each photo has a csv file.
Save csv file (daily): Save additional files for csv information. There is only one csv file a day.
Save csv file (monthly): Save additional files for csv information. There is only one csv file in a month.
Save csv file (per photo; scalar): Use scalar/value format to save additional files for csv information. Each photo has a csv file.
Save csv file (daily; scalar): Use scalar/value format to save additional files for csv information. There is only one csv file a day.
Save csv file (monthly; scalar): Use scalar/value format to save additional files for csv information. There is only one csv file in a month. For more storage information, please see “(2) Storage” section.
(v) Text setting
The text setting let you set text and background properties. The details are described below.
Text color: Sets the text color. It includes 17 commonly used colors.
Text visibility: 0% represents invisible (completely transparent). 100% is completely visible.
Text style: It contains normal, bold, italic, and bold italic. Depending on text fonts, some effects may not be displayed.
Text font: It contains the basic fonts available on Android mobile devices. Some fonts may not be displayed if your mobile device manufacturer is not installed. For NoteCam Pro/Paid users, we also provide the function of importing fonts. However, it is a bit complicated. You need to find an Android-compatible font yourself and place it in your current storage directory with the file name font.otf or font.ttf. For example, the path is /DCIM/NoteCam/font.otf.
About custom fonts, Google provides fonts on the google.com website for your use. As for other fonts, there may be some incompatible or completely incompatible situations. You need to use them at your discretion. Finally, please note that a large font file may not only slow down the storage speed, but may even crash.
Text size: The default is 1x size. It is scaled automatically with photo resolution. If you feel that the font is too large or too small, you can adjust the size. The maximum is 1.5 times. The minimum is 0.5 times.
Background color: Sets the background color. It includes 17 commonly used colors.
Background visibility: 0% means no background (completely transparent). 100% is completely visible (completely opaque).
Background width: We use the appropriate width for most mobile devices as the default background width. However, some mobile devices may be too wide or too narrow. You can use this setting to adjust the width of the background. The default is 1x wide. The maximum is 1.5 times. The minimum is 0.5 times. Basically, this setting is not recommended unless necessary.
Background height: The default value is automatic. If you have a lot of columns to show, you can set up multiple columns, up to ten columns (the Lite/Free version is five columns). If the number of columns you have chosen exceeds the number of columns you have set, the description of the extra columns will be displayed in the last column. For example, if you set up three-column notes and five-column notes are entered, the fourth and fifth columns are displayed at the end of the third column.
Text/Background on camera preview: The text setting is primarily for text and background on photos. Therefore, the text on the camera preview is black words (default). If you want to see the text and background settings on the camera preview screen for your mobile device, please choose “Photo text font.” Also, if you don’t want to see any text on the camera preview, please choose “Hidden text.”
(vi) Watermark setting [Available only for NoteCam Pro/Paid]
Sets the type and format of watermark. The watermark type can be “No watermark,” “Text watermark,” or “Graphic watermark.” If you choose “No watermark,” the settings below are invalid; otherwise, you need to set the “Watermark visibility” and “Watermark location” below. If you choose “Text watermark,” you need to set the following text settings which include the content, the color, the style, the font, and the size. If the text watermark cannot meet your needs, you can use the graphic watermark to customize the watermark. The graphic watermark is set in a more complicated way. You need to design a PNG image, and then place it in the current storage directory. The file name is called watermark.png. For example, the path is /DCIM/NoteCam/watermark.png. The resolution size of the PNG image is up to you. The system will be placed in the proper place according to the original scale.
However, please note that the image is not recommended too large. Photos need to be post-processing. A large image will not only slow down the storage speed, but may even crash due to lack of memory.
For the watermark setting, we make the following details.
Watermark type: There are three types which are “no watermark,” “text watermark,” and “graphic watermark.”
Watermark visibility: It is the setting for "text watermark" and "graphic watermark." The value is from 10% to 100%. 10% is close to transparent. 100% is fully visible.
Watermark location: Set the position of the text or graphic display. It includes “upper left,” “upper center,” “upper right,” “middle left,” “middle center,” “middle right,” “lower left,” “lower center,” and “lower right” positions.
The following is the detail required for the text watermark.
Text watermark content: Enter the watermark text to be displayed.
Text watermark color: Sets the text watermark color. It includes 17 commonly used colors.
Text watermark style: It contains normal, bold, italic, and bold italic. Depending on text fonts, some effects may not be displayed.
Text watermark font: It contains the basic fonts available on Android mobile devices. Some fonts may not be displayed if your mobile device manufacturer is not installed.
Text watermark size: It is scaled automatically with photo resolution. If you feel that the font is too large or too small, you can adjust the size. The maximum is 5.0 times. The minimum is 0.25 times.
(vii) Orientation setting
The orientation setting let you set screen orientation and photo orientation.
Orientation: Set screen/photo orientation. “Automatic” would detect your device orientation automatically. The advantage is that the system will automatically determine the appropriate photography direction. The disadvantage is that it needs to constantly detect direction. It will affect the performance of use. “Landscape” means the orientation is the horizontal direction. “Portrait” represents the orientation is the vertical direction. No matter how a mobile device is rotated, the orientation is fixed.
Forcibly rotating photos: Some mobile devices' photo orientation is wrong. There will be differences of 90 degrees in comment direction and photo direction. Tick the checkbox if your mobile device cannot properly rotate photos. Note that the checkbox should not be checked if your mobile device can properly rotate photos.
Attention: The camera preview screen would be correct.
However, it does not mean the orientation of photographs is correct. You can take a vertical picture (portrait), and make sure the photograph is good.
Help us improve: This option will collect your “forcibly rotating photos” value to our server. The purpose is to assist other users who use the same mobile devices to set the values. Please be assured that it does not collect your personal information.
(viii) Format (unit type)
Set a format of unit types in photographs. The formats include “metric (m, km)” and “imperial (ft, mi).”
(ix) Format (GPS coordinates)
Set a format of GPS coordinates. The formats include “degrees (0.000000°),” “minutes (0°00.000’),” and “seconds (0°00’00”).”
(x) Format (date/time)
Set a format of date and time. The formats include “YYYY-MM-DD hh:mm:ss,” “MM-DD-YYYY hh:mm:ss,” “DD-MM-YYYY hh:mm:ss,” “YYYY-MM-DD hh:mm,” “MM-DD-YYYY hh:mm,” “DD-MM-YYYY hh:mm,” “hh:mm:ss,” and “hh:mm.”
[YYYY] indicates a four-digit year, 0000 through 9999. [MM] indicates a two-digit month of the year, 01 through 12. [DD] indicates a two-digit day of that month, 01 through 31. [hh] refers to a zero-padded hour between 00 and 23. [mm] refers to a zero-padded minute between 00 and 59. [ss] refers to a zero-padded second between 00 and 59.
(C2) Exit
Exit the application program.
(D) Basic information
Basic information includes GPS information and date/time information. The details are described below.
GPS information: Display users current GPS coordinates information, including latitude, longitude, altitude/elevation, and accuracy. The formatting setting is on “setting”→“format (GPS coordinates).” If the GPS feature does not receive a valid signal, it shows “waiting for a valid GPS signal.” If the GPS feature does not open, it shows “the GPS
feature does not open.” The altitude/elevation information may be empty if your device uses Wi-Fi-based positioning system (WPS).
Time: Display the current time. The formatting setting is on “setting” → “format (date/time).”
(E) Central point
The central point let users know where the photo center is. Moreover, you can go to “setting” → “photo setting,” and then set “display central point” checkbox to be checked if you want to display a central point in photographs.
(F) Gallery thumbnail
It is a photo thumbnail. When you click the image button, it will link to your default gallery application.
(G) Touch screen
When the camera lens has the function of providing manual focus, you can touch the screen to perform manual focus. (Note that many front-facing camera lenses do not provide this functionality.) In addition, you can use two fingers to slide out or slide in to adjust the zoom in or out.
- Version5.19
- UpdateSep 20, 2024
- DeveloperDerekr Corp.
- CategoryTravel & Local
- Requires AndroidAndroid 6+
- Downloads9M+
- Package Namecom.derekr.NoteCam
- Signature707994dc1f3aec6dd426a6036fe4f111
- Available on
- ReportFlag as inappropriate
-
NameSizeDownload
-
11.88 MB
-
6.60 MB
-
6.57 MB











quite user friendly
easy to set up
edit option after saving suggested
no video facility